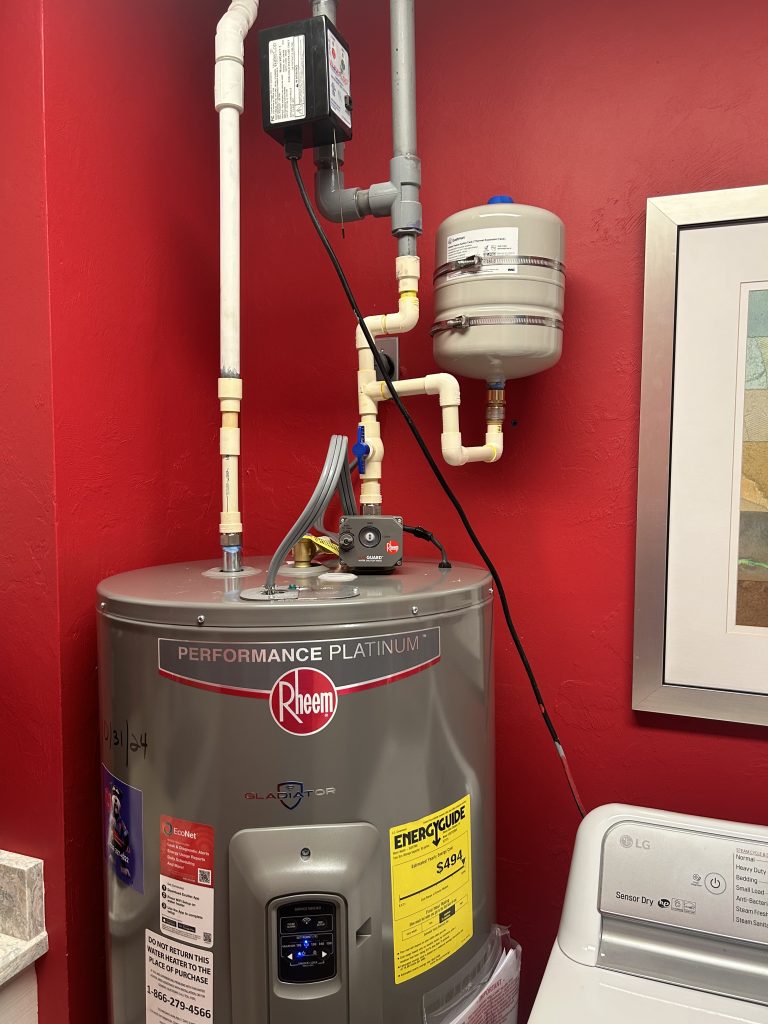
How Direct Copper-to-Galvanized Connections Silently Destroy Water Heater Installations And What a Proper Fix Looks Like
Every year in Southwest Florida, homeowners replace water heaters years ahead of schedule because of a problem that has nothing to do with the tank itself. The tank is fine. The issue is what was done at the connections on top of it.
A plumber ran copper pipe directly onto the galvanized steel nipples threaded into the heater, skipped the correct transition fittings, and walked away. That mistake set an invisible clock ticking the moment the water was turned back on.
Mike Reynolds, owner of Plumbing Detectives LLC and a licensed plumbing contractor, has pulled hundreds of these installations apart.
“It’s one of the most common things I see. Someone installs a water heater and connects the copper pipe straight to the galvanized nipple. No brass transition. No buffer. Just copper threaded directly onto galvanized steel. By the time the homeowner notices something’s wrong, the nipple is eaten through or the connection is weeping and the subfloor is wet.”
This article explains exactly why that installation fails—the electrochemistry behind it, not just the rule and what a correct installation looks like.
The Problem: Copper on Galvanized Is Not a Minor Shortcut
Water heaters manufactured today ship with galvanized steel nipples already installed in the hot and cold ports at the top of the tank.
Galvanized steel has a zinc coating that helps protect the underlying steel from rust. That coating is the nipple’s first line of defense.
The problem begins when copper pipe or a copper fitting is threaded directly onto the galvanized nipple.
Copper and galvanized steel are dissimilar metals. They sit far apart on the electrochemical scale that governs how metals behave when they touch each other in the presence of water.
Put them in direct contact, run water through the connection, and you create an electrochemical cell that generates a measurable voltage and drives a continuous corrosion reaction.
The zinc coating on the galvanized nipple becomes the sacrificial metal. It gradually oxidizes and dissolves into the water.
This happens silently inside the joint. There may be no visible warning, bubbling, discoloration, smell, or obvious exterior damage.
When the zinc coating is finally consumed, the bare carbon steel underneath becomes exposed to the same electrochemical attack. Carbon steel then corrodes even faster.
Eventually, the nipple fails. A slow seep becomes a leak. A leak can become a flood. A water heater that should have lasted 12 to 15 years may need to be replaced after only seven.
None of this is the heater’s fault. It is the installation.
The Science: How Galvanic Corrosion Actually Works
Galvanic corrosion requires three conditions:
- Two dissimilar metals
- Direct electrical contact between them
- An electrolyte, a fluid capable of conducting electricity bridging the two metals
Tap water acts as the electrolyte.
When these three conditions are present, the two metals form a galvanic cell. One metal becomes the anode and corrodes, while the other becomes the cathode and is protected.
Which metal corrodes is determined by the position of each material in the galvanic series.
The Galvanic Series
| Metal | Potential | Role in Plumbing |
|---|---|---|
| Copper | +73 mV | Cathode—protected |
| Brass | −67 mV | Intermediate buffer |
| Zinc coating | −927 mV | Anode—corrodes |
The rule is straightforward: the more cathodic metal is protected, while the more anodic metal corrodes.
Copper is the cathode. Zinc is the anode. When copper connects directly to galvanized steel, the copper is protected and the zinc coating is consumed.
The Voltage Driving the Damage
The potential difference between copper and zinc in tap water is approximately 1,000 millivolts, or roughly one volt.
For context, corrosion can become meaningful when the potential difference between two connected metals exceeds approximately 50 millivolts.
The copper-to-zinc connection exceeds that threshold by a factor of approximately 20.
What Happens Inside the Connection
At the galvanized nipple, zinc oxidizes:
Zn → Zn²⁺ + 2e⁻
Zinc atoms lose electrons and dissolve into the water as zinc ions. Those electrons travel through the metal connection into the copper pipe.
The water completes the ionic circuit by carrying charged particles between the two metal surfaces.
It functions like a battery:
- The zinc is the fuel.
- The water is the electrolyte.
- The copper pipe is the protected cathode.
- The threaded connection is where the damage concentrates.
Why It Goes Undetected
The corrosion occurs internally at the threaded connection between the galvanized nipple and the copper fitting.
It is hidden inside the pipe and may also be covered by insulation, trim, or surrounding materials.
The homeowner often receives no warning until the zinc has been depleted, the steel corrodes through, and water finally finds a path out.
By that point, the damage is already underway.
Why Brass Is the Correct Transition Material
The correct installation places a brass fitting between the galvanized nipple and the copper piping.
Brass sits much closer to copper on the galvanic scale than zinc does.
- Copper: +73 mV
- Brass: −67 mV
- Zinc: −927 mV
The potential difference between copper and brass is approximately 140 millivolts, compared with roughly 1,000 millivolts between copper and zinc.
That represents an approximate 86 percent reduction in the galvanic driving force at the transition.
Brass does not eliminate all galvanic activity, but it dramatically slows the reaction and serves as the accepted buffer between galvanized steel and copper.
Brass also develops a surface oxide layer that can further reduce ion transfer over time.
The goal is simple: never allow copper to make direct contact with the galvanized nipple.
What a Correct Water Heater Installation Looks Like
Every transition from galvanized steel to copper should pass through brass. There should be no direct copper-to-galvanized contact anywhere in the connection.
Cold-Water Side
The cold supply line feeds into the top of the tank through the galvanized cold-water inlet nipple.
A correct connection sequence is:
- A brass tee is threaded directly onto the galvanized cold nipple.
- The expansion tank is installed through the appropriate port of the brass tee.
- A copper male adapter connects to the brass tee.
- A short section of copper pipe connects to a new copper ball valve.
- The ball valve connects to the cold-water supply serving the home.
The complete transition is:
Galvanized steel → brass tee → copper male adapter → copper pipe
The galvanized nipple never directly touches copper. Brass serves as the buffer.
Hot-Water Side
The hot-water outlet at the top of the tank also uses a galvanized steel nipple.
A correct connection sequence is:
- A brass female union is threaded directly onto the galvanized hot nipple.
- A copper male adapter connects to the other side of the brass union.
- Copper piping continues from the adapter to the home’s hot-water distribution system.
The complete transition is:
Galvanized steel → brass female union → copper male adapter → copper pipe
Why the Union Matters
The brass union is not only about corrosion protection. It also improves future serviceability.
A union allows the connection to be separated using a wrench. When the heater eventually reaches the end of its service life, the next plumber can disconnect the piping without cutting into the copper line.
A coupling requires cutting. A union requires turning a wrench.
Unions cost only slightly more than standard fittings, but they make future repairs and replacements cleaner and more professional.
The Expansion Tank
When water heats, it expands. In a closed plumbing system, that additional volume cannot move backward into the municipal supply because a backflow-prevention device blocks it.
The increased pressure then pushes against the water heater, valves, fittings, fixtures, and appliances.
An expansion tank provides a place for the expanded water volume to go, helping maintain stable pressure throughout the plumbing system.
The expansion tank should be installed on the cold-water supply side near the heater, which is why it connects through the brass tee in the proper installation sequence.
Applicable code requirements can depend on the property and plumbing configuration, so the installation should be evaluated by a licensed plumbing professional.
How to Check Your Own Water Heater
You do not need to be a plumber to identify signs of a potentially problematic installation.
Step 1: Locate the Top Connections
Find the two pipes connected to the top of the water heater.
One is the cold-water inlet, which is often located on the right and may have a blue label or shutoff handle. The other is the hot-water outlet, commonly positioned on the left.
Step 2: Identify the Tank Nipples
The nipples are the short pipe sections threaded directly into the top of the water heater.
If they appear silver-colored with a rough or matte surface, they may be galvanized steel. Some modern heaters use dielectric nipples with internal plastic liners.
Call a licensed plumber when the material is unclear.
Step 3: Look at the First Fitting
Identify the first fitting directly above each nipple.
If a copper male adapter, copper elbow, or copper pipe connects directly to the galvanized nipple, there may be no brass transition protecting the connection.
That is the problem this article describes.
Step 4: Look for Warning Signs
Inspect the connection area for:
- White or green deposits around the threads
- Rust stains running down from the connection
- Moisture or dampness on top of the tank
- Corrosion around valves or fittings
- Signs of past leaking or water damage
Have the installation evaluated by a licensed plumber if you see any of these conditions.
Step 5: Check for an Expansion Tank
Look for a small cylindrical tank connected to the cold-water supply near the water heater.
If the system is closed and no expansion tank is installed, thermal expansion may be placing unnecessary pressure on the heater and its connections.
What the Correct Repair Involves
The proper repair is not to coat the leaking threads with more tape, sealant, or pipe dope.
The proper repair is to remove the direct copper-to-galvanized connection and reinstall it using the appropriate brass transition fittings.
Depending on the system and the condition of the existing piping, this may involve:
- Removing the incorrect copper fittings
- Inspecting the galvanized nipples for corrosion
- Replacing damaged nipples where necessary
- Installing brass transition fittings
- Adding a proper union
- Installing or correcting the expansion tank
- Testing the completed system for leaks and pressure
Correcting the installation can cost far less than repairing water damage or replacing a water heater years before the end of its expected service life.
Read the Complete Illustrated Guide
Read the complete illustrated guide explaining galvanic corrosion, the electrochemical reaction, the correct brass transition method, and how to inspect your existing water heater connections.
Sources
- ASPE Pipeline, “Plumbing Design for Success: Understanding and Preventing Copper Corrosion.”
- Matsukawa et al., “Galvanic Series of Metals Conventionally Used in Tap Water,” Corrosion, Volume 67.
- Princeton University MAE 324 Electrochemistry Laboratory, standard electrode potentials.
- Allied Plumbing & Heating, “Why Water Heater Connections Fail.”
- Clear Water Industries, “Galvanic Corrosion in Water Systems: Causes & Prevention.”
- American Galvanizers Association, guidance on galvanic corrosion and dissimilar metals.